Asus wireless router and VLAN tagging
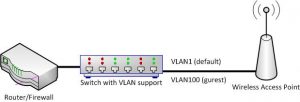
The idea in general is to have multiple wireless networks at home – one for the house residents, the other for visitors. The home network should have full access to everything, while the guest network should be able to reach the Internet, but nothing else.
I have Asus RT-AC87U, which is a fine router, but does not show these capabilities in its web GUI. I had flushed it with a derived firmware called AsusWRT-Merlin which added the ability to insert custom scripts.
I’ve had to research a bit, until I got something working. For future tinkering, and for any who requires it, I will add my scripts here.
First – in the web interface, enable guest network and, under Administration->System enable JFFS custom scripts.
Then, connect via SSH to the router, and place a script called /jffs/scripts/services-start containing:
#!/bin/sh
touch /tmp/000brstarted
PATH="/sbin:/usr/sbin:/bin:/usr/bin:${PATH}"
robocfg vlan 100 ports "1t 2t 3t 4t 5t 8t"
vconfig add eth0 100
ifconfig vlan100 up
brctl addbr br1
brctl addif br1 vlan100
brctl delif br0 wl0.1
brctl addif br1 wl0.1
ifconfig br1 192.168.230.254 netmask 255.255.255.0 up
nvram set lan_ifnames="vlan1 eth1"
nvram set lan_ifname="br0"
nvram set lan1_ifnames="vlan100 wl0.1"
nvram set lan1_ifname="br1"
nvram set lan1_ipaddr=192.168.230.254
nvram commit
killall eapd
eapd
Run chmod +x /jffs/scripts/services-start so that it will work correctly.
This script will configure VLAN100 on all ports (including the internal ones 5 and 8), as VLAN tags (meaning – not access). Then it will add the VLAN to eth0 – which is the host interface for the external switch ports (eth1 is for the Wireless ports), bring it up, and create a bridge consisting of vlan100 and the additional wireless sub-interface wl0.1 (which is the guest interface). I did not bother setting up 5GHz guest network, so I didn’t have an additional wl1.1 sub-interface. If you configure a 5GHz guest network, you will need to add it to the bridge device. Then I’ve given the bridge interface an IP address so I could test it from my router, and setup nvram to hold these settings. Unfortunately, these settings must be defined each boot, and they are not kept without the script.
Maybe on my next post I will describe my switch network layout and settings. On a future post, I might even describe how to transfer VLANs to a VM running under KVM, and maybe even explain my router settings, so that eventually the readers (other than myself, of course) could reproduce this setup at their homes.


